Opening Description
Picture yourself in a warm kitchen, the sweet aroma of freshly baked pie wafting through the air, wrapping you in a cozy embrace as it mingles with notes of butter and vanilla. That’s the magic of a homemade all-butter pie crust—a culinary treasure that elevates any filling you choose, whether it’s a comforting fruit medley or a sumptuous cream-based delight. Each bite of this flaky, golden crust strikes the perfect chord between lightness and richness, cradling luscious fillings while adding its own irresistible flavor to the ensemble.
As you take a slice, the crust breaks into delicate layers, releasing a satisfying crunch that complements the smoothness of the filling. You savor the buttery richness, the hint of sweetness from the sugar, and the enticing contrast of textures. This all-butter pie crust isn’t just about holding delicious ingredients; it opens up a world of flavor, making every pie special, each slice a celebration. So, roll up your sleeves and ready your senses, because this staple in the baking realm is not just a recipe; it’s an experience you’ll eagerly want to recreate again and again.
Why You’ll Love This All Butter Pie Crust
Creating an all-butter pie crust brings joy to your baking adventures. This recipe stands out because it envelops your fillings with a rich, buttery flavor that you simply can’t achieve with vegetable shortening or store-bought alternatives. Each piece of dough sings with a richness that adds depth to your delicious fillings, turning ordinary desserts into extraordinary treats worthy of any occasion.
Imagine serving a pie crafted with this crust at your next family gathering, the smiles of satisfaction lighting up everyone’s faces. The versatility of this crust means it perfectly complements a range of fillings: from classic apple to rich chocolate cream. The flakiness coupled with the buttery taste makes this pie crust a favorite in any kitchen and a staple for any baker. Putting just a bit of effort into making your own crust pays off in flavor and texture, transforming your creations into cherished memories.
Preparation Phase & Tools to Use
To embark on this delightful baking journey, arm yourself with some essential tools that will make the process smooth sailing. Each tool plays its part in crafting the perfect pie crust.
- Food Processor: This indispensable kitchen gadget does the heavy lifting, blending the ingredients swiftly and efficiently. It ensures the butter stays chilled, which is key to achieving that sought-after flakiness.
- Rolling Pin: Choose one that feels comfortable in your hands. This tool helps you roll out the dough evenly for a beautiful, consistent crust.
- Pie Dish: Opt for a glass or ceramic pie dish so you can monitor the browning of your crust.
- Pastry Brush: A handy brush to apply egg wash if you want a glossy, golden finish after baking.
Preparation tips to keep in mind: chill your ingredients and tools whenever possible to keep the butter firm. If you anticipate baking multiple pies, this crust freezes beautifully, giving you the luxury of having homemade pie crust ready in no time.
Ingredients for All Butter Pie Crust
Embarking on this baking adventure requires just a few simple ingredients, each playing a crucial role in crafting the ultimate pie crust. Here’s what you’ll need:
- 2 ½ cups all-purpose flour: This forms the structure of your crust. For a gluten-free alternative, consider using a 1:1 gluten-free flour blend.
- 1 cup unsalted butter, chilled and cut into cubes: The star of the show! It provides that rich flavor and flaky texture. If you prefer, you can substitute some of this butter with cold coconut oil for a unique twist.
- 1 teaspoon salt: This enhances the flavors in your crust, making it subtly delicious.
- 1 tablespoon sugar: Just a hint of sweetness helps balance the flavors and promotes browning in your crust.
- 6-8 tablespoons ice water: The moisture is essential to bring the dough together while keeping it cold.
How to Make All Butter Pie Crust
-
Blend the Dry Ingredients: In a food processor, combine the flour, salt, and sugar until well mixed. Feel the excitement build as the ingredients come together.
-
Incorporate the Butter: Add your cold, cubed butter into the mixture. Pulse until it resembles coarse crumbs, ensuring you leave some small pieces of butter for that flaky texture that we all crave.
-
Add Ice Water: With the food processor running, drizzle in the ice water one tablespoon at a time. Stop when the dough comes together but be careful not to overmix. This step is crucial—they say patience makes perfect!
-
Chill the Dough: Divide the dough in half, shaping each half into a disk. Wrap these disks in plastic wrap and refrigerate for at least one hour. This chilling process allows the butter to firm up, ensuring a flaky crust.
-
Roll It Out: After chilling, take one disk out of the fridge. On a lightly floured surface, roll out the dough to fit your pie dish, aiming for about 1/8-inch thickness. Turn the dough occasionally for even rolling, letting the spirit of pie-making guide you.
-
Transfer to the Pie Dish: Carefully place the rolled-out crust into the dish, gently pressing it into place. Trim any excess dough, leaving a bit over the edge for crimping. Crimp the edges beautifully for an artisanal touch, then fill with your desired filling before baking.
Chef’s Notes & Helpful Tips
For those who love to plan ahead, this all-butter pie crust is your best friend. You can prepare the dough a day in advance; just keep it wrapped tightly in the fridge. It also freezes beautifully! Simply thaw overnight in the fridge before rolling it out.
Alternatively, if you want to experiment, consider using an air fryer for baking small pies or tarts for a fun twist! Infuse your pie with flavors by adding a teaspoon of vanilla or almond extract to the dough.
Let your imagination run wild! Want to enhance the flavor? Incorporate finely minced herbs for savory dishes or zests from citrus fruits to impart extra brightness to sweet pies.
Common Mistakes to Avoid
The journey to pie perfection can be marred by a few common pitfalls. Here are some mistakes that might thwart your efforts, along with tips on how to sidestep them:
- Using Warm Ingredients: Always ensure your butter is cold. Warm butter can create a greasy, tough crust rather than a flaky one. Stick that butter in the freezer for 10-15 minutes if needed!
- Overmixing the Dough: The less you handle the dough, the better. Avoid the temptation to overmix; otherwise, you’ll end up with a dense crust.
- Not Chilling the Dough: Skipping the refrigeration step will result in a crust that shrinks during baking. Patience pays off!
- Ignoring the Thickness: Rolling the dough too thin not only risks tearing but can lead to a substrate that’s too delicate to hold in the filling. Aim for a thickness of about 1/8 inch for ideal results.
What to Serve With All Butter Pie Crust
Your all-butter pie crust is the perfect canvas for a myriad of delectable fillings. Here are some pairing ideas that will make your taste buds rejoice:
- Classic Apple Pie: The combination of warm, spiced apples enveloped in buttery crust is a timeless favorite.
- Chocolate Cream Pie: Indulge in rich chocolate pudding topped with whipped cream for a decadent dessert.
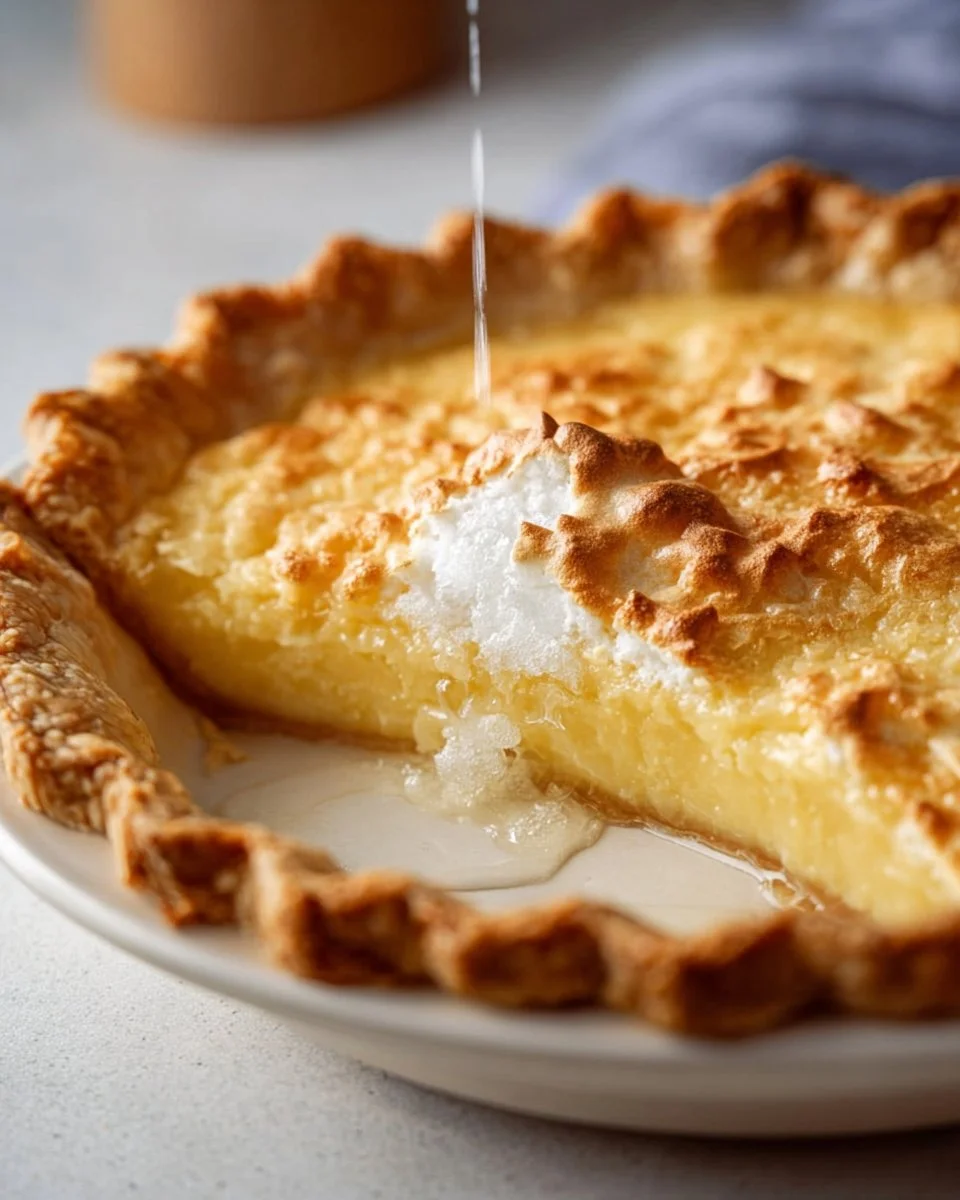
- Lemon Meringue Pie: Bright and tangy lemon filling mingles beautifully with fluffy meringue, all perched on a flaky crust.
- Pumpkin Pie: The warm spices of pumpkin filling and sweetened condensed milk create a delightful autumn treat.
- Pecan Pie: Sweet, nutty, and just a little crunchy—this chewy wonder makes a perfect partner for the buttery crust.
- Fresh Berry Tart: Top the crust with fresh berries and a light custard for a satisfying summer dessert.
- Quiche: Fill with savory eggs and vegetables for a delightful brunch option.
Storage & Reheating Instructions
Storing your all-butter pie crust properly ensures you maintain its delightful texture and flavor. If you’ve baked your pie, cover it loosely with foil or plastic wrap and store in the refrigerator for up to three days. For longer storage, freeze it in an airtight container for up to three months.
To reheat, simply pop your pie into a preheated oven at 350°F for about 15-20 minutes or until warmed through. Your crust will regain its flakiness, and the filling will be irresistibly warm.
Estimated Nutrition Information
While this recipe is loaded with flavor, it’s also important to consider portion sizes and personal dietary needs. For a single serving (1/8 of a 9-inch pie), you can expect approximately:
- Calories: 240
- Total Fat: 14g
- Saturated Fat: 8g
- Carbohydrates: 27g
- Protein: 2g
Please note that these figures can vary based on specific ingredients used and portion sizes.
FAQs
1. Can I make this dough ahead of time?
Absolutely! You can prepare the dough up to two days in advance, keeping it tightly wrapped in plastic in the fridge. It also freezes well, so you can make it weeks ahead and thaw when you’re ready to bake.
2. What is the best way to roll out the dough?
Use a well-floured surface and rolling pin, applying gentle, even pressure while rolling out the dough. Turn it often to maintain a circular shape. If the dough sticks, add a bit more flour to your surface and rolling pin.
3. How can I tell when the pie crust is done baking?
Look for a golden-brown color along the edges and a slightly darker base. The aroma of warm butter is also a great indicator you’ve hit the mark!
4. What if my dough feels too dry?
If your dough feels crumbly, add a bit more ice water, one tablespoon at a time, until it comes together.
5. Can I use this crust for savory pies?
Absolutely! This all-butter pie crust works beautifully for savory fillings, such as quiche or pot pie. Just adjust the sugar content slightly, or leave it out altogether for a more savory experience.
Conclusion
Making an all-butter pie crust is more than a simple baking task; it’s a heartfelt endeavor that brings warmth and satisfaction to any occasion. With each buttery layer, you craft flavor-packed memories, whether you’re serving a slice to loved ones or indulging in a quiet moment with your favorite fill. So gather your ingredients and tools, and let the delightful adventure of pie-making begin. You won’t just end up with a slice of pie; you’ll create a delicious moment that lingers long after the last bite. Happy baking!
Print
All Butter Pie Crust
- Prep Time: 15 minutes
- Cook Time: 30 minutes
- Total Time: 45 minutes
- Yield: 1 pie crust 1x
- Category: Dessert
- Method: Baking
- Cuisine: American
- Diet: Vegetarian
Description
A rich, flaky all-butter pie crust that perfectly complements any filling, from fruit to cream-based delights.
Ingredients
- 2 ½ cups all-purpose flour
- 1 cup unsalted butter, chilled and cut into cubes
- 1 teaspoon salt
- 1 tablespoon sugar
- 6–8 tablespoons ice water
Instructions
- Blend the dry ingredients: In a food processor, combine the flour, salt, and sugar until well mixed.
- Incorporate the butter: Add your cold, cubed butter into the mixture. Pulse until it resembles coarse crumbs.
- Add ice water: With the food processor running, drizzle in the ice water one tablespoon at a time until the dough comes together.
- Chill the dough: Divide the dough in half, shape into disks, and refrigerate for at least one hour.
- Roll it out: Roll out the dough on a floured surface to fit your pie dish, aiming for 1/8-inch thickness.
- Transfer to the pie dish: Place the rolled-out crust into the dish, pressing it into place and trimming any excess dough.
Notes
Chill ingredients and tools to keep butter firm. This crust freezes beautifully; thaw overnight before use.
Nutrition
- Serving Size: 1 slice
- Calories: 240
- Sugar: 1g
- Sodium: 200mg
- Fat: 14g
- Saturated Fat: 8g
- Unsaturated Fat: 5g
- Trans Fat: 0g
- Carbohydrates: 27g
- Fiber: 1g
- Protein: 2g
- Cholesterol: 30mg