Introduction to Cherry Chocolate Cheesecake
As a busy mom, I know how precious time can be, especially when it comes to whipping up something special for my family. That’s why I absolutely adore this Cherry Chocolate Cheesecake! It’s a delightful treat that combines rich, creamy cheesecake with the lusciousness of chocolate and the sweetness of cherries. Perfect for impressing guests or simply indulging after a long day, this dessert is a quick solution that doesn’t skimp on flavor. Trust me, once you serve this beauty, you’ll be the star of the kitchen!
Why You’ll Love This Cherry Chocolate Cheesecake
This Cherry Chocolate Cheesecake is a dream come true for busy lives! It’s easy to make, requiring just a handful of ingredients and minimal prep time. The rich chocolate flavor paired with sweet cherries creates a taste sensation that will have everyone asking for seconds. Plus, it’s a showstopper that looks as good as it tastes, making it perfect for any occasion. You’ll love how quickly it disappears!
Ingredients for Cherry Chocolate Cheesecake
Gathering the right ingredients is the first step to creating your Cherry Chocolate Cheesecake masterpiece. Here’s what you’ll need:
- Graham cracker crumbs: These form the base of your cheesecake crust, providing a sweet and crunchy texture.
- Unsalted butter: Melted butter binds the crumbs together, adding richness to the crust.
- Cream cheese: The star of the show! Softened cream cheese gives the cheesecake its creamy, velvety texture.
- Granulated sugar: This sweetens the filling, balancing the rich flavors of chocolate and cream cheese.
- Vanilla extract: A splash of vanilla enhances the overall flavor, adding warmth and depth.
- Eggs: Essential for structure, eggs help the cheesecake set perfectly while keeping it moist.
- Sour cream: This adds a tangy flavor and creaminess, making the cheesecake even more luscious.
- Cocoa powder: Unsweetened cocoa powder brings that rich chocolate flavor, making this cheesecake a chocolate lover’s dream.
- Cherry pie filling: Topping your cheesecake with this sweet and tart filling adds a burst of flavor and a beautiful finish.
For those looking to switch things up, consider using fresh cherries for a more natural taste or gluten-free graham crackers if you have dietary restrictions. You can find all the exact measurements at the bottom of the article, ready for printing!
How to Make Cherry Chocolate Cheesecake
Now that you have all your ingredients ready, let’s dive into the delightful process of making this Cherry Chocolate Cheesecake. Follow these simple steps, and you’ll be on your way to creating a dessert that will wow your family and friends!
Step 1: Preheat the Oven
First things first, preheat your oven to 325°F (160°C). Preheating is crucial for baking cheesecake. It ensures even cooking and helps the cheesecake rise properly. A well-preheated oven sets the stage for a perfectly baked dessert!
Step 2: Prepare the Crust
In a mixing bowl, combine your graham cracker crumbs and melted butter. Stir until the crumbs are fully coated. This mixture should resemble wet sand. Next, press it firmly into the bottom of your springform pan. Use the back of a measuring cup or your fingers to create an even layer. This crust will provide a delicious crunch to your creamy cheesecake!
Step 3: Make the Cheesecake Filling
In a large mixing bowl, beat the softened cream cheese, granulated sugar, and vanilla extract together until smooth. I like to use an electric mixer for this step; it makes the process quicker and easier. Once combined, add the eggs one at a time, mixing well after each addition. This helps to incorporate air, making your cheesecake light and fluffy!
Step 4: Combine Ingredients
Now it’s time to add the sour cream and cocoa powder. Gently fold them into the cream cheese mixture until fully combined. The sour cream adds a lovely tang, while the cocoa powder brings that rich chocolate flavor. Make sure there are no lumps; you want a smooth filling!
Step 5: Bake the Cheesecake
Pour the chocolate cheesecake mixture over your prepared crust in the springform pan. Bake in the preheated oven for 50-60 minutes. Keep an eye on it! The center should be set but still slightly jiggly. This is the secret to a creamy cheesecake. If it looks too wobbly, give it a few more minutes.
Step 6: Cool and Refrigerate
Once baked, remove the cheesecake from the oven and let it cool in the pan for about an hour. This cooling process is essential; it helps prevent cracks. After it’s cooled, refrigerate the cheesecake for at least 4 hours, or overnight if you can wait! Chilling allows the flavors to meld beautifully.
Step 7: Add Cherry Topping
Before serving, top your chilled cheesecake with cherry pie filling. Spread it evenly over the surface, letting those vibrant red cherries shine. This not only adds flavor but also makes your dessert look stunning. Now, slice, serve, and watch everyone’s eyes light up!
Tips for Success
- Make sure your cream cheese is at room temperature for easy mixing.
- Don’t overmix the batter; this keeps your cheesecake from cracking.
- Use a water bath for even baking and a creamier texture.
- Let the cheesecake cool completely before refrigerating to avoid condensation.
- For a fun twist, try adding a splash of almond extract to the filling!
Equipment Needed
- Springform pan: Essential for easy removal; a regular cake pan works too, but it’s trickier to serve.
- Mixing bowls: Use a large bowl for the filling; any size will do, just ensure it’s sturdy.
- Electric mixer: Makes blending easier; a whisk works if you’re feeling adventurous!
- Measuring cups and spoons: Accurate measurements are key; a kitchen scale can be handy too.
Variations of Cherry Chocolate Cheesecake
- Dark Chocolate Cheesecake: Swap out the cocoa powder for dark chocolate for a richer flavor.
- White Chocolate Cherry Cheesecake: Use white chocolate instead of cocoa powder for a sweet twist.
- Gluten-Free Option: Use gluten-free graham crackers or almond flour for the crust.
- Vegan Version: Substitute cream cheese with vegan cream cheese and use flax eggs instead of regular eggs.
- Nutty Crust: Add crushed nuts like pecans or almonds to the graham cracker crust for extra crunch.
- Cheesecake Bars: Instead of a round cheesecake, pour the mixture into a baking dish for easy-to-cut bars.
Serving Suggestions for Cherry Chocolate Cheesecake
- Pair with a dollop of whipped cream for added creaminess.
- Serve alongside fresh berries for a pop of color and freshness.
- Drizzle with chocolate sauce for an extra indulgent touch.
- Enjoy with a cup of coffee or a glass of dessert wine.
- Garnish with mint leaves for a beautiful presentation.
FAQs about Cherry Chocolate Cheesecake
Can I use fresh cherries instead of cherry pie filling?
Absolutely! Fresh cherries can add a delightful, natural flavor to your Cherry Chocolate Cheesecake. Just pit and slice them, then sprinkle them on top before serving for a fresh twist.
How do I know when my cheesecake is done baking?
The center of your cheesecake should be set but still slightly jiggly. It will continue to firm up as it cools. If it looks too wobbly, give it a few more minutes in the oven.
Can I make this cheesecake ahead of time?
Yes! This Cherry Chocolate Cheesecake is perfect for making ahead. Just bake it, cool it, and refrigerate it for up to three days before serving. It actually tastes better after a day in the fridge!
What can I do if my cheesecake cracks?
Cracks can happen, but don’t worry! If your cheesecake cracks, you can cover it with cherry pie filling. It not only hides the cracks but also adds extra flavor!
Is this cheesecake suitable for special diets?
Yes! You can easily adapt this recipe for various dietary needs. Use gluten-free graham crackers for a gluten-free version or vegan cream cheese for a dairy-free option. Enjoy the deliciousness without the worry!
Final Thoughts
Creating this Cherry Chocolate Cheesecake is more than just baking; it’s about sharing joy and deliciousness with those you love. The rich layers of chocolate and the sweet burst of cherries come together to create a dessert that feels like a warm hug. Whether it’s a family gathering or a quiet evening at home, this cheesecake brings smiles and satisfied sighs. I hope you find as much happiness in making and sharing this treat as I do. So, roll up your sleeves, embrace the process, and enjoy every delightful bite of your Cherry Chocolate Cheesecake!
Print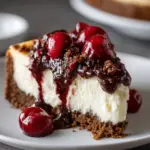
Cherry Chocolate Cheesecake: Indulge in Delightful Layers!
- Prep Time: 20 minutes
- Cook Time: 60 minutes
- Total Time: 4 hours 20 minutes
- Yield: 12 servings 1x
- Category: Dessert
- Method: Baking
- Cuisine: American
- Diet: Vegetarian
Description
A rich and creamy cheesecake layered with chocolate and topped with sweet cherries, perfect for dessert lovers.
Ingredients
- 1 1/2 cups graham cracker crumbs
- 1/2 cup unsalted butter, melted
- 2 cups cream cheese, softened
- 1 cup granulated sugar
- 1 teaspoon vanilla extract
- 3 large eggs
- 1 cup sour cream
- 1/2 cup cocoa powder
- 1 cup cherry pie filling
Instructions
- Preheat the oven to 325°F (160°C).
- In a bowl, mix graham cracker crumbs and melted butter, then press into the bottom of a springform pan.
- In a large mixing bowl, beat cream cheese, sugar, and vanilla until smooth.
- Add eggs one at a time, mixing well after each addition.
- Stir in sour cream and cocoa powder until fully combined.
- Pour the chocolate cheesecake mixture over the crust in the springform pan.
- Bake for 50-60 minutes or until the center is set.
- Remove from the oven and let cool, then refrigerate for at least 4 hours.
- Top with cherry pie filling before serving.
Notes
- For a firmer cheesecake, bake a little longer.
- Let the cheesecake cool completely before refrigerating.
- Use fresh cherries for a more natural flavor if desired.
Nutrition
- Serving Size: 1 slice
- Calories: 350
- Sugar: 25g
- Sodium: 200mg
- Fat: 22g
- Saturated Fat: 12g
- Unsaturated Fat: 8g
- Trans Fat: 0g
- Carbohydrates: 30g
- Fiber: 1g
- Protein: 5g
- Cholesterol: 80mg