Introduction to Peanut Butter Blossom Bars
As a busy mom, I know how precious time can be, especially when it comes to whipping up something sweet. That’s why I absolutely adore these Peanut Butter Blossom Bars! They’re not just a quick solution for a hectic day; they’re a delightful treat that brings smiles to my family’s faces. Imagine the rich, creamy peanut butter paired with a sweet chocolate kiss on top—pure bliss! Whether you’re looking to impress guests or simply satisfy a craving, these bars are the perfect answer. Trust me, they’ll become a favorite in your home!
Why You’ll Love This Peanut Butter Blossom Bars
These Peanut Butter Blossom Bars are a dream come true for busy lives! They come together in just 35 minutes, making them a quick and easy dessert option. The combination of peanut butter and chocolate is simply irresistible, satisfying both sweet and savory cravings. Plus, they’re perfect for sharing at gatherings or enjoying as a late-night snack. With minimal ingredients and maximum flavor, you’ll find yourself making these bars again and again!
Ingredients for Peanut Butter Blossom Bars
Gathering the right ingredients is the first step to creating these delightful Peanut Butter Blossom Bars. Here’s what you’ll need:
- Creamy Peanut Butter: This is the star of the show! It adds richness and a nutty flavor that pairs perfectly with chocolate.
- Granulated Sugar: Sweetness is key! This sugar helps create that lovely chewy texture we all love in bars.
- Large Egg: The egg acts as a binder, helping to hold everything together while adding moisture.
- Vanilla Extract: A splash of vanilla enhances the overall flavor, making each bite even more delicious.
- Baking Soda: This little leavening agent helps the bars rise slightly, giving them a light texture.
- Salt: Just a pinch! It balances the sweetness and brings out the flavors of the peanut butter and chocolate.
- Chocolate Kisses: The crowning glory! These sweet treats melt slightly when pressed into the warm bars, creating a delightful chocolatey finish.
For those looking to mix things up, consider using different flavored chocolate kisses, like caramel or mint. You can find all the exact measurements for these ingredients at the bottom of the article, ready for printing!
How to Make Peanut Butter Blossom Bars
Step 1: Preheat and Prepare
First things first, preheat your oven to 350°F (175°C). This step is crucial because it ensures even baking. While the oven warms up, grab a 9×9 inch baking pan and grease it well. You can use butter or cooking spray. A well-greased pan prevents the bars from sticking, making it easier to cut them later. Trust me, you don’t want to lose any of that deliciousness!
Step 2: Mix the Ingredients
In a mixing bowl, combine the creamy peanut butter, granulated sugar, egg, vanilla extract, baking soda, and salt. Use a sturdy spatula or a hand mixer to blend everything until smooth. Make sure there are no lumps! This mixture should be thick and creamy, almost like a cookie dough. The aroma of peanut butter will fill your kitchen, and you’ll know you’re on the right track!
Step 3: Spread the Mixture
Now it’s time to spread the mixture evenly in your prepared baking pan. Use a spatula to scoop the batter and gently press it down. Start from the center and work your way to the edges. This helps create an even layer, ensuring that every bite is just as delicious as the last. Don’t worry if it’s a bit sticky; that’s perfectly normal!
Step 4: Bake to Perfection
Place the pan in your preheated oven and bake for 20-25 minutes. Keep an eye on them! You’ll know they’re done when the edges turn golden brown and a toothpick inserted in the center comes out clean. If you wait too long, they might dry out, so set a timer. The smell wafting through your home will be heavenly, and you’ll be counting down the minutes!
Step 5: Add the Chocolate Kisses
As soon as you pull the bars from the oven, it’s time for the chocolate kisses! Press one kiss into the center of each bar while they’re still warm. The heat will melt the bottom of the kisses slightly, creating a gooey, chocolatey topping. This step is where the magic happens, transforming your bars into a delightful treat!
Step 6: Cool and Cut
Let the bars cool completely in the pan. This usually takes about 30 minutes. Once they’re cool, use a sharp knife to cut them into squares. I like to cut them into generous portions, but you can make them smaller if you prefer. The chocolate kisses will hold their shape, making each piece look as good as it tastes!
Tips for Success
- Make sure your peanut butter is at room temperature for easier mixing.
- Use a rubber spatula to scrape down the sides of the bowl for a smooth batter.
- Don’t overbake! Keep an eye on the bars to maintain that chewy texture.
- Let the bars cool completely before cutting to avoid crumbling.
- Experiment with different chocolate kiss flavors for a fun twist!
Equipment Needed
- 9×9 inch Baking Pan: A square pan is ideal, but an 8×8 inch pan works too.
- Mixing Bowl: Any large bowl will do; a glass or metal bowl is great for easy mixing.
- Spatula: A rubber spatula helps combine ingredients smoothly; a wooden spoon is a good alternative.
- Measuring Cups: Essential for accurate ingredient measurements; you can use a kitchen scale if preferred.
- Oven Mitts: Protect your hands when handling hot pans; a thick kitchen towel can work in a pinch.
Variations
- Nut-Free Option: Substitute peanut butter with sunflower seed butter for a nut-free treat.
- Gluten-Free: Use gluten-free baking soda and ensure all other ingredients are certified gluten-free.
- Vegan Version: Replace the egg with a flax egg (1 tablespoon ground flaxseed mixed with 2.5 tablespoons water) and use dairy-free chocolate kisses.
- Flavor Twists: Try adding a teaspoon of cinnamon or a splash of almond extract for a unique flavor profile.
- Chunky Style: Mix in chopped nuts or chocolate chips for added texture and flavor.
Serving Suggestions
- Pair these Peanut Butter Blossom Bars with a glass of cold milk for a classic treat.
- Serve them warm with a scoop of vanilla ice cream on top for an indulgent dessert.
- For a festive touch, dust with powdered sugar before serving.
- Present them on a colorful platter for gatherings or parties.
FAQs about Peanut Butter Blossom Bars
As I’ve shared my love for these Peanut Butter Blossom Bars, I often get questions from fellow home cooks. Here are some of the most common inquiries I’ve encountered:
Can I use crunchy peanut butter instead of creamy?
Absolutely! Crunchy peanut butter will add a delightful texture to your bars. Just keep in mind that it may slightly alter the smoothness of the final product.
How should I store leftover bars?
Store your Peanut Butter Blossom Bars in an airtight container at room temperature. They’ll stay fresh for about a week. If you want to keep them longer, you can freeze them for up to three months!
Can I make these bars ahead of time?
Yes! These bars are perfect for making ahead. Just bake them, let them cool, and store them in an airtight container. They’ll be ready to enjoy whenever you need a sweet treat!
What can I use instead of chocolate kisses?
If you’re looking for a change, try using chocolate chips or even caramel candies. They’ll melt beautifully and add a different flavor twist to your bars!
Are these bars suitable for kids?
Definitely! Kids love the combination of peanut butter and chocolate. Just be mindful of any nut allergies if you’re sharing with friends or at school events.
Final Thoughts
Making these Peanut Butter Blossom Bars is more than just baking; it’s about creating sweet memories with loved ones. The joy of pulling a warm batch from the oven, the aroma filling your kitchen, and the smiles on your family’s faces as they take that first bite—priceless! These bars are a delightful treat that can brighten any day, whether it’s a busy weekday or a special occasion. So, roll up your sleeves, gather your ingredients, and let the magic happen. Trust me, once you try these bars, they’ll become a cherished recipe in your home!
Print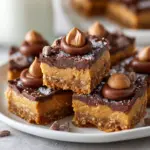
Peanut Butter Blossom Bars: A Sweet Treat You Must Try!
- Prep Time: 10 minutes
- Cook Time: 25 minutes
- Total Time: 35 minutes
- Yield: 24 bars 1x
- Category: Dessert
- Method: Baking
- Cuisine: American
- Diet: Vegetarian
Description
Peanut Butter Blossom Bars are a delicious and easy-to-make dessert that combines the rich flavor of peanut butter with a sweet chocolate kiss on top.
Ingredients
- 1 cup creamy peanut butter
- 1 cup granulated sugar
- 1 large egg
- 1 teaspoon vanilla extract
- 1/2 teaspoon baking soda
- 1/4 teaspoon salt
- 24 chocolate kisses
Instructions
- Preheat your oven to 350°F (175°C) and grease a 9×9 inch baking pan.
- In a mixing bowl, combine the peanut butter, sugar, egg, vanilla extract, baking soda, and salt until smooth.
- Spread the mixture evenly in the prepared baking pan.
- Bake for 20-25 minutes or until the edges are golden brown.
- Remove from the oven and immediately press a chocolate kiss into the center of each bar.
- Allow to cool completely before cutting into squares.
Notes
- For a twist, try using different flavored chocolate kisses.
- Store leftovers in an airtight container at room temperature.
- These bars can be frozen for up to 3 months.
Nutrition
- Serving Size: 1 bar
- Calories: 150
- Sugar: 10g
- Sodium: 100mg
- Fat: 8g
- Saturated Fat: 2g
- Unsaturated Fat: 6g
- Trans Fat: 0g
- Carbohydrates: 18g
- Fiber: 1g
- Protein: 3g
- Cholesterol: 10mg